Linux Network Configuration for Gigabit Ethernet Cameras
Cameras that are connected via Gigabit Ethernet (e.g. cameras that use the GigE Vision protocol) will typically not work out of the box on Linux if they are connected directly to the computer.
On Windows and macOS the default network configuration of a network
card will first attempt to obtain an IP address via DHCP, and if that
fails they will fall back to link-local addressing and assign an IP
address in the 169.254.x.y range. Most cameras that are connected
via Gigabit Ethernet will use the same logic for network configuration.
If both are connected to a network that has a DHCP server, both will
obtain an IP address in that network; however, if the camera is
connected directly to a computer (not as part of a network), both will
obtain a link-local address in the 169.254.x.y range.
This algorithm is not what happens on most Linux distributions by default. Instead, only DHCP will be attempted, and if that fails, no IP address will be assigned to that interface at all.
In the following sections it will be discussed how to configure the network for the case where a camera is directly connected to a network interface, and link-local addressing is required.
Configuration via NetworkManager
Most Linux distributions use NetworkManager to configure the network by default. NetworkManager can be configured to use either DHCP or link-local addressing, but not both.
To switch to link-local addressing, go to the network settings for the network device that the camera is connected to (make sure you select the right device), go to the IPv4 configuration, and then switch from DHCP to Link-Local Only. The following screenshot shows how this is done on current Ubuntu (other distributions will be similar):
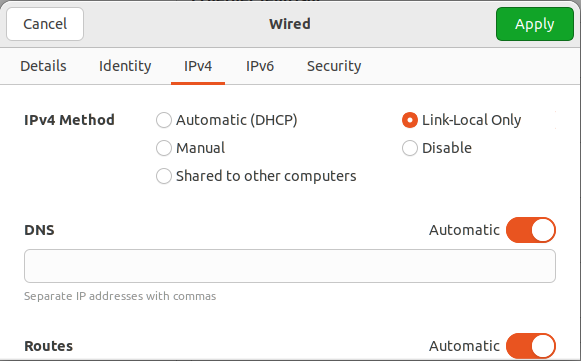
After applying this setting, disconnect the network device and
then reconnect it. When looking at the details the device should
have an IP address in the range 169.254.x.y assigned.
Configuration via systemd-networkd
For embedded appliances (not using a GUI), systemd-networkd is often a better choice for network configuration than NetworkManager. This section describes how to configure systemd-networkd to use link-local addressing.
Disabling NetworkManager
In some cases NetworkManager will still be installed, even if systemd-networkd is used to configure the network. To ensure that NetworkManager doesn’t interfere, it is possible to tell it to not touch specific network interfaces.
In order to do so, create a file
/etc/NetworkManager/conf.d/disabled-interfaces.conf with the
following contents:
[keyfile]
unmanaged-devices=mac:MAC_ADDRESS_OF_THE_INTERFACE
For example, if the MAC address of the network interface was
52:54:00:00:11:22, then the file would look like:
[keyfile]
unmanaged-devices=mac:52:54:00:00:11:22
If there are two network interfaces that NetworkManager shouldn’t
configure, with the MAC addresses 52:54:00:00:11:22 and
52:54:00:33:44:55, then the file would look like:
[keyfile]
unmanaged-devices=mac:52:54:00:00:11:22,mac:52:54:00:33:44:55
It is only possible to specify interfaces to ignore via the MAC address in NetworkManager.
Restart NetworkManager (systemctl restart NetworkManager.service)
after changing this configuration.
Configuring Only Link-Local Addressing
Create a file /etc/systemd/network/10-camera.network (you can use
any file name for this as long as it’s in /etc/systemd/network and
has the extension .network) with the following contents:
[Match]
MACAddress=52:54:00:00:11:22

[Network]
DHCP=no
LinkLocalAddressing=ipv4
You can use either the MAC address of the interface in question in the
[Match] section, or use any of the other ways to match a network
interface as described in the
systemd-networkd documentation.
(You can also use LinkLocalAddressing=yes instead of
LinkLocalAddressing=ipv4 to also enable IPv6 for that interface,
if so required.)
Configuring DHCP with Link-Local Addressing as Fallback
You can also configure systemd-networkd to work with the same algorithm as Windows and macOS, i.e. to try DHCP first, and if that fails, to fall back to link-local addressing.
Create a file /etc/systemd/network/10-camera.network (you can use
any file name for this as long as it’s in /etc/systemd/network and
has the extension .network) with the following contents:
[Match]
MACAddress=52:54:00:00:11:22

[Network]
DHCP=ipv4
LinkLocalAddressing=ipv4
This will cause systemd-networkd to first attempt DHCP, and if that fails to fallback to link-local addressing.
(You can also use LinkLocalAddressing=yes instead of
LinkLocalAddressing=ipv4 to also enable IPv6 for that interface,
if so required.)
Note
Older versions of systemd-networkd (up to systemd version 252)
would assign both a link-local address and a DHCP address if
DHCP was successful in that configuration. For systemd versions
248 to 252 there is a setting
LinkLocalAddressing=ipv4-fallback that achieved the current
behavior.
If both a link-local address and a DHCP address were to be
assigned to an interface, contacting a camera would typically
still work, so using LinkLocalAddressing=ipv4 is the
recommended option, because it will result in a working
configuration regardless of the systemd version.
Enabling systemd-networkd
On most distributions systemd-networkd is disabled by default. To enable and start it, run the following commands (as root):
systemctl enable systemd-networkd
systemctl start systemd-networkd
The first line ensures that systemd-networkd is enabled at boot, the second line starts it right now.
After the service has been enabled, you can check via the
ip -4 addr command to see if the IP address has been assigned
yet. For link-local addresses this may take a couple of seconds.
The following example output shows a link-local address being assigned to the network interface:
3: enp6s0: <BROADCAST,MULTICAST,UP,LOWER_UP> mtu 1500 qdisc fq_codel state UP group default qlen 1000
    inet 169.254.198.189/16 metric 2048 brd 169.254.255.255 scope link enp6s0
       valid_lft forever preferred_lft forever
Note that the network cable must be plugged in and the camera on the other side switched on, otherwise systemd-networkd will not attempt to assign an IP to that interface until the cable is plugged in.
You can also use networkctl to check the status of the network
interfaces. Note that when a link-local address is assigned to an
interface, networkctl considers that interface to be degraded,
even if that is what we want here. networkctl will display the
following output if the network cable is not plugged in or the
other device is not currently switched on:
IDX LINK   TYPE     OPERATIONAL SETUP
...
  3 enp6s0 ether    no-carrier  configured
While it is still configuring the IP address (after plugging in the network cable and switching on the other device), it will look like this:
IDX LINK   TYPE     OPERATIONAL SETUP
...
  3 enp6s0 ether    carrier     configured
And after it has obtained a link-local IP address it will look like:
IDX LINK   TYPE     OPERATIONAL SETUP
...
  3 enp6s0 ether    degraded    configured